


In this artice, we will :
- have an introduction to KubeSphere.
- have an overview of functionalities offered by KubeSphere platform, specifically for DevOps system.
- learn how to install or enable KubeSphere Devops component.
What is KubeSphere
Introduction
KubeSphere is a distributed operating system for cloud-native application management, using Kubernetes as its kernel. It provides a plug-and-play architecture, allowing third-party applications to be seamlessly integrated into its ecosystem.
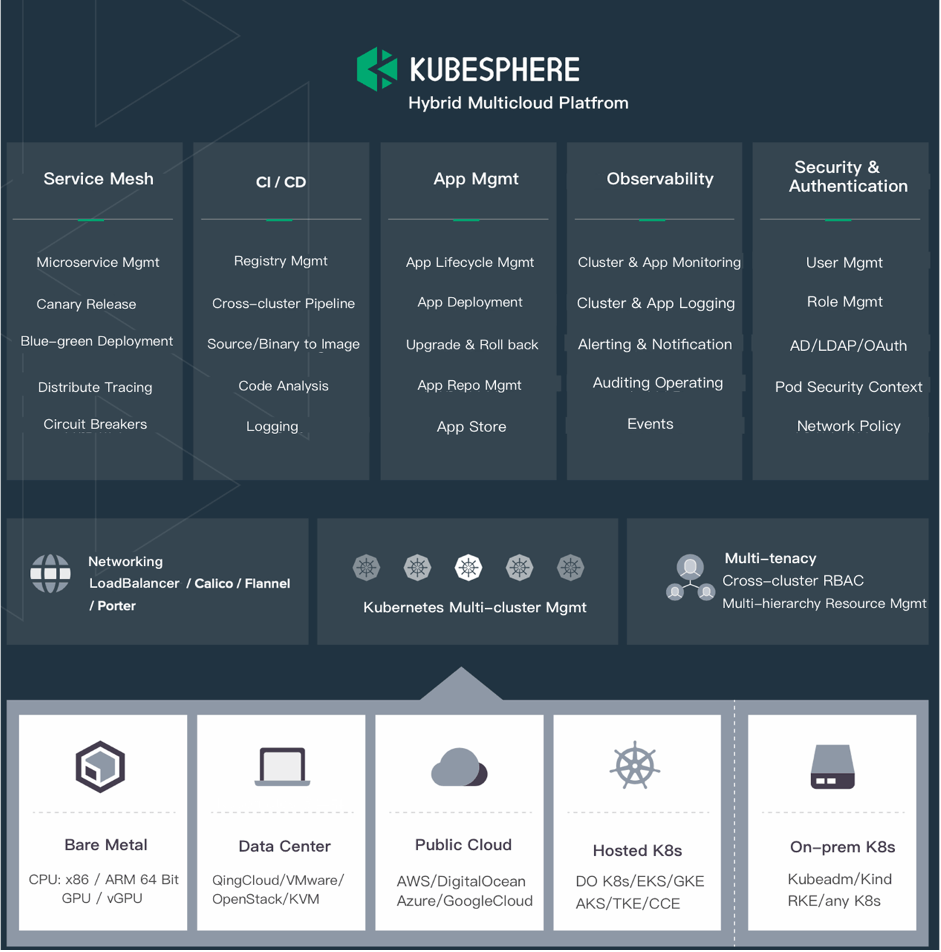
A DevOps professional can leverage various functionalities offered by KubeSphere needed for enterprise Kubernetes strategies viz. Kubernetes resource management, DevOps (CI/CD), application lifecycle management, monitoring, logging, service mesh, multi-tenancy, alerting and notification, auditing, storage and networking, autoscaling, access control, GPU support, multi-cluster deployment and management, network policy, registry management, and security management.
Below is a graphical representation of what KubeSphere has to offer but not limited to.
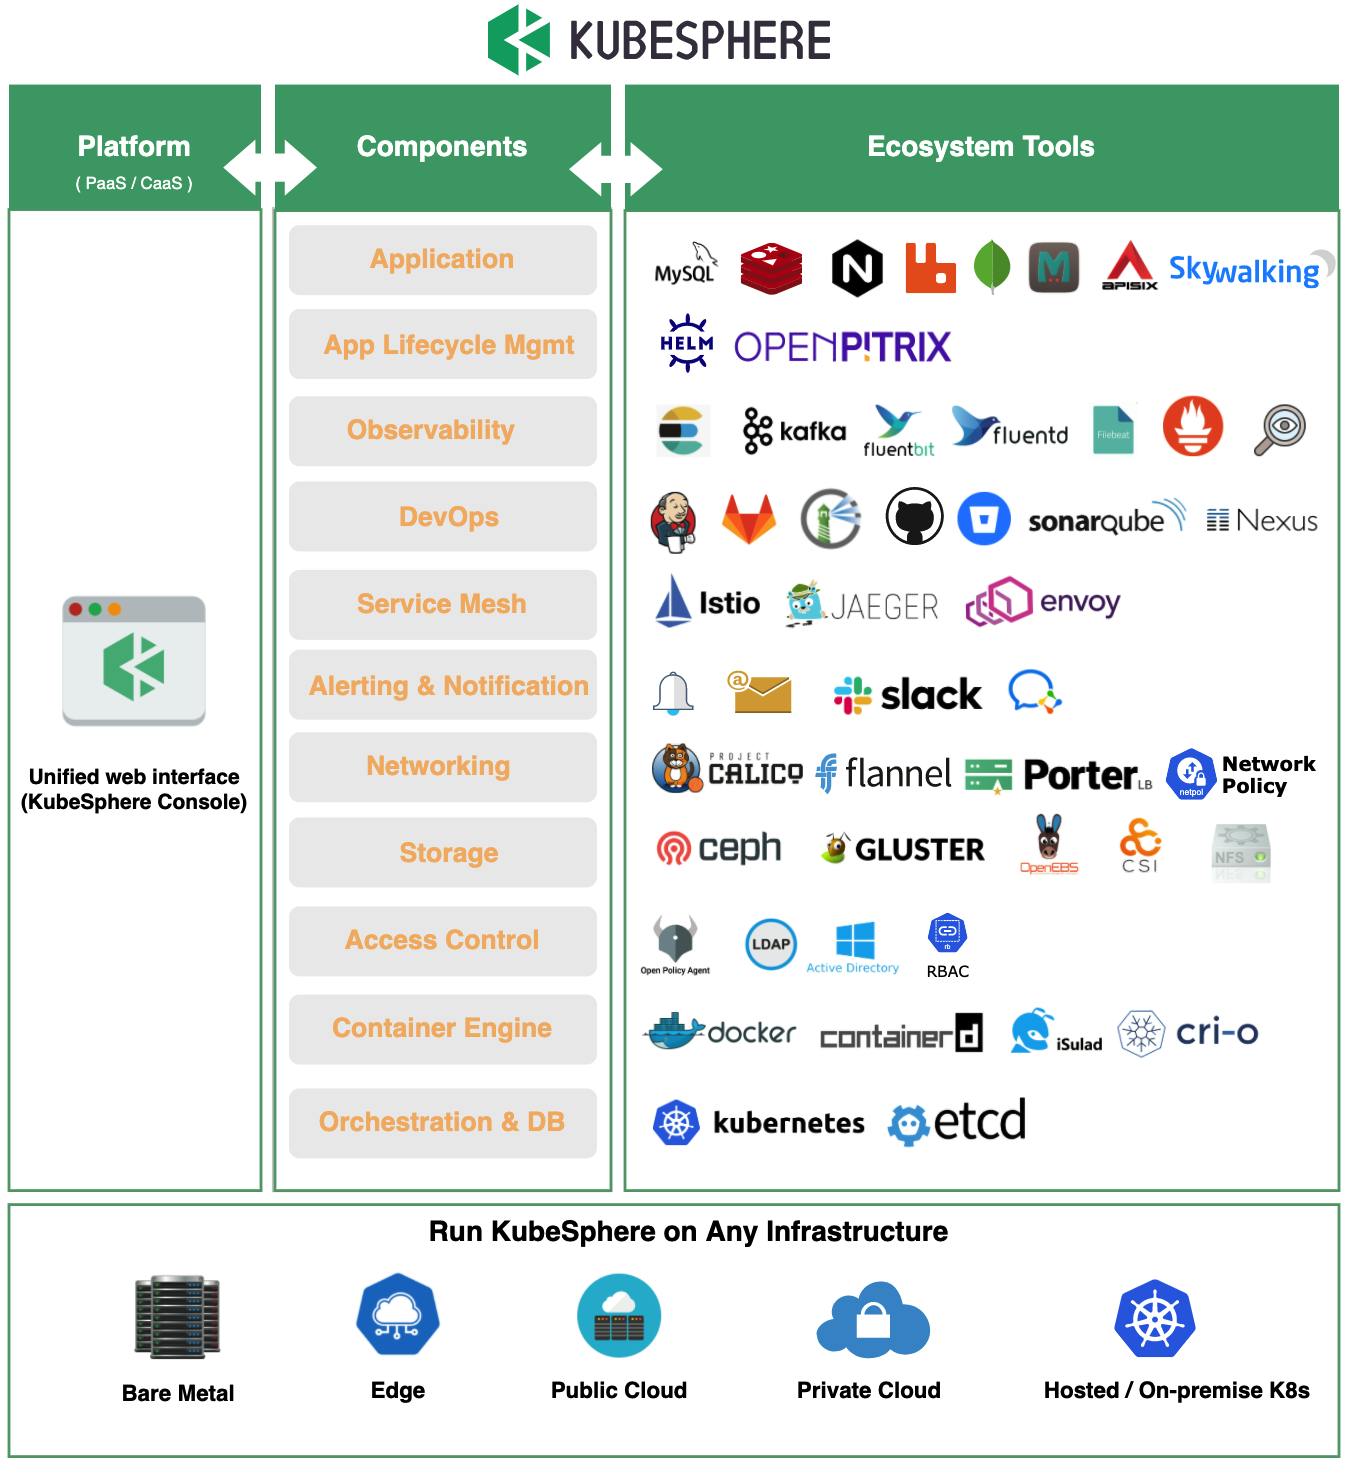
The image below lists all the tools that KubeSphere can use almost out of the box.
Support for DevOps
KubeSphere provides a pluggable DevOps component based on popular CI/CD tools such as Jenkins. It features automated workflows and tools including Source-to-image (S2I) and Binary-to-image (B2I) to package source code or binary artifacts into ready-to-run container images.
DevOps Automation
Automation represents a key part of implementing DevOps. With automatic, streamlined pipelines in place, users are better positioned to distribute apps in terms of continuous delivery and integration.
Jenkins-powered. The KubeSphere DevOps system is built with Jenkins as the engine, which is abundant in plugins. On top of that, Jenkins provides an enabling environment for extension development, making it possible for the DevOps team to work smoothly across the whole process (developing, testing, building, deploying, monitoring, logging, notifying, etc.) in a unified platform. The KubeSphere account can also be used for the built-in Jenkins, meeting the demand of enterprises for multi-tenant isolation of CI/CD pipelines and unified authentication.
Convenient built-in tools. As a user, we can easily take advantage of automation tools (for example, Binary-to-Image and Source-to-Image) even without a thorough understanding of how Docker or Kubernetes works. We only need to submit a registry address or upload binary files (for example, JAR/WAR/Binary). Ultimately, services will be released to Kubernetes automatically without any coding in a Dockerfile.
To know more about the features and functionalities offered by KubeSphere, visit the official documentation here.
What is KubeSphere DevOps
Intro to DevOps
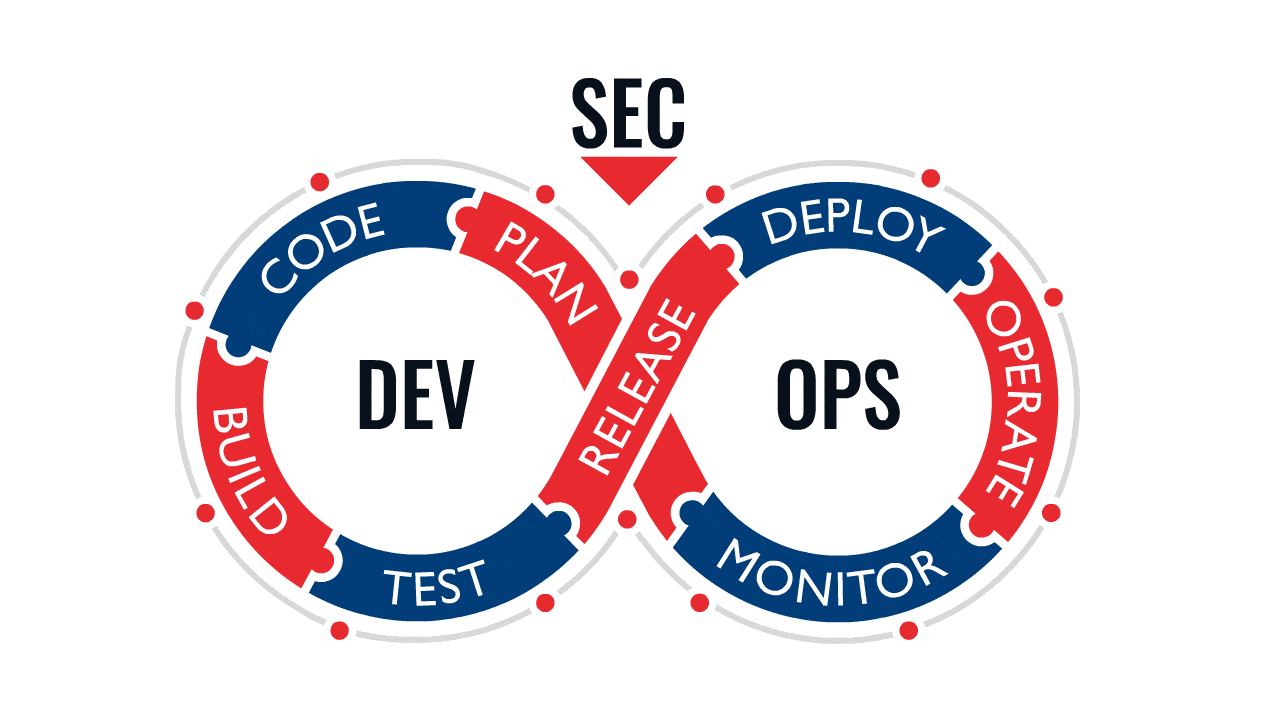
DevOps is a set of practices and tools that automate the processes between IT and software development teams. Among other things, as agile software development sees increasing popularity, continuous integration (CI) and continuous delivery (CD) have become an ideal solution in this connection. In a CI/CD workflow, every integration is tested through automatic building, including coding, releasing and testing. This helps developers to identify any integration errors beforehand and teams can deliver internal software to a production environment with speed, security, and reliability.
The Pain Point
The traditional master-agent architecture of Jenkins (i.e. multiple agents work for a master) has the following shortcomings:
- The entire CI/CD pipeline will crash once the master goes down.
- Resources are not allocated equally as some agents see pipeline jobs wait in queue while others remain idle.
- Different agents may be configured in different environments and require different coding languages. The disparity can cause inconvenience in management and maintenance.

KubeSphere DevOps for rescue
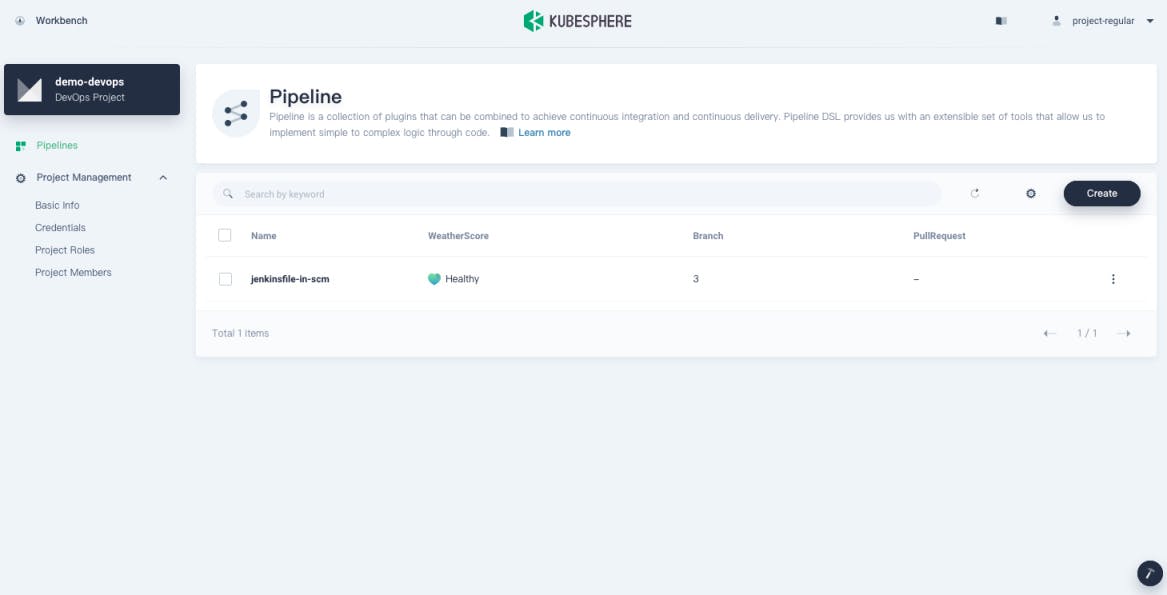
KubeSphere DevOps projects support source code management tools such as GitHub, Git, and SVN. Users can deploy and manage CI/CD pipelines through graphical editing panels (Jenkinsfile out of SCM) or create a Jenkinsfile-based pipeline from the code repository (Jenkinsfile in SCM).
Features
The KubeSphere DevOps system provides you with the following features:
- Independent DevOps projects for CI/CD pipelines with access control.
- Out-of-box DevOps functions with no complex Jenkins configurations.
- Source-to-image (S2I) and Binary-to-image (B2I) for rapid delivery of images.
- Jenkinsfile-based pipelines for consistent user experience which support multiple code repositories.
- Graphical editing panels to create pipelines with a low learning curve.
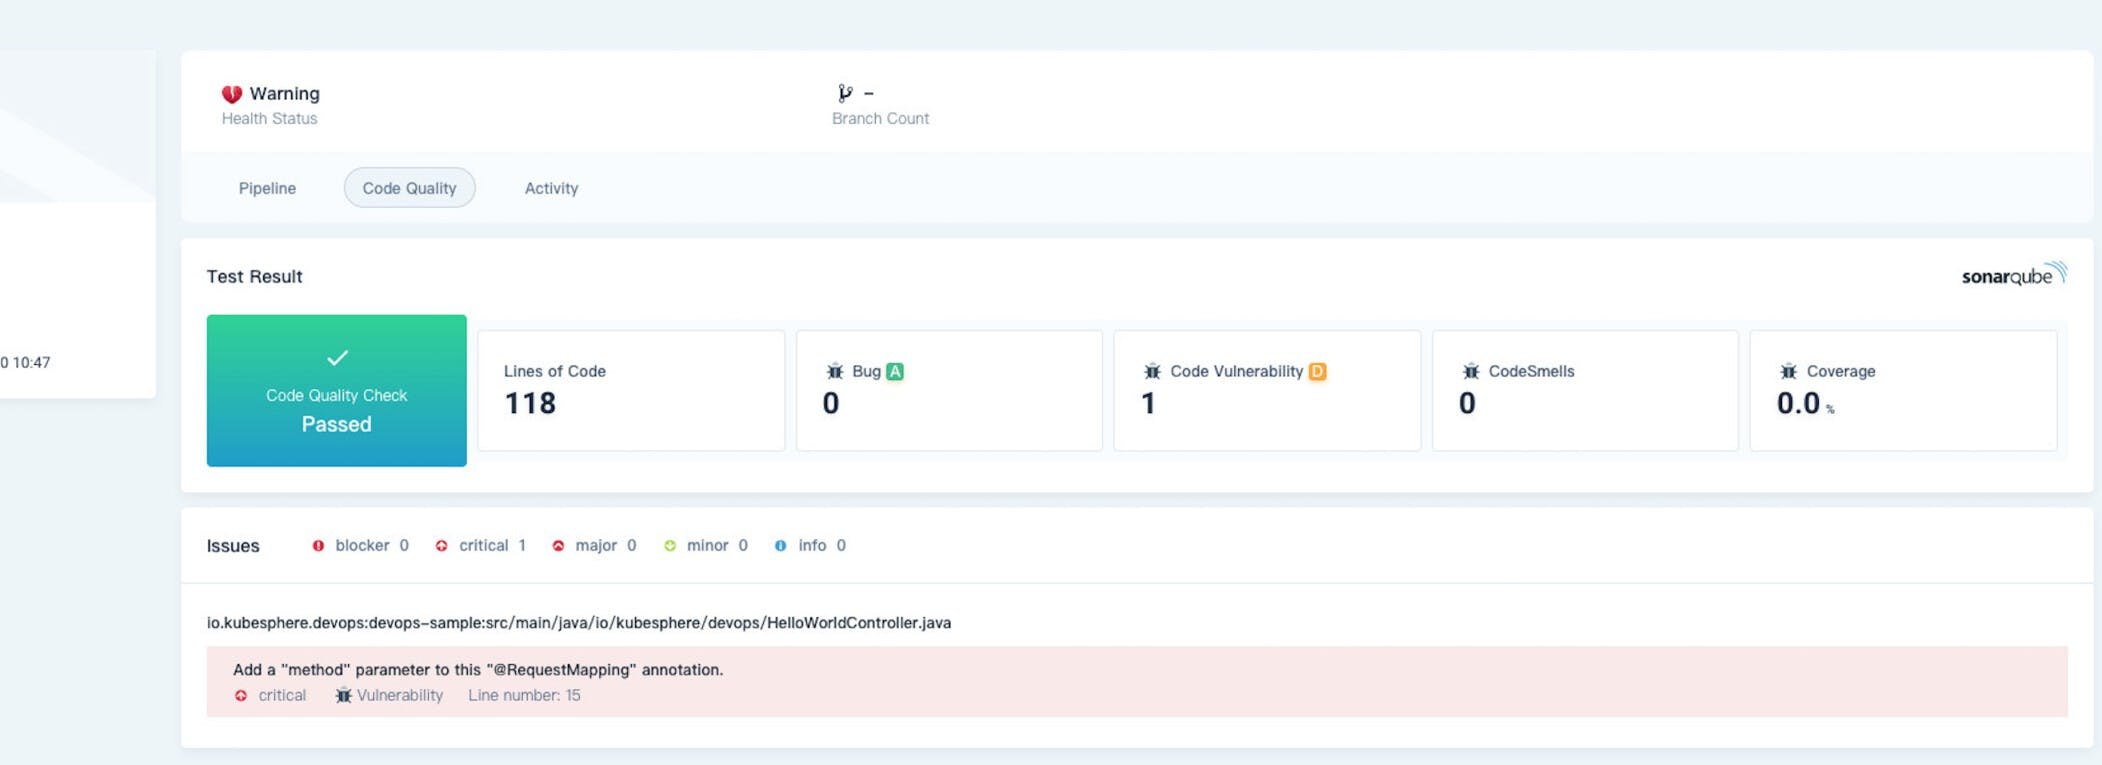
- A powerful tool integration mechanism such as SonarQube for code quality check.
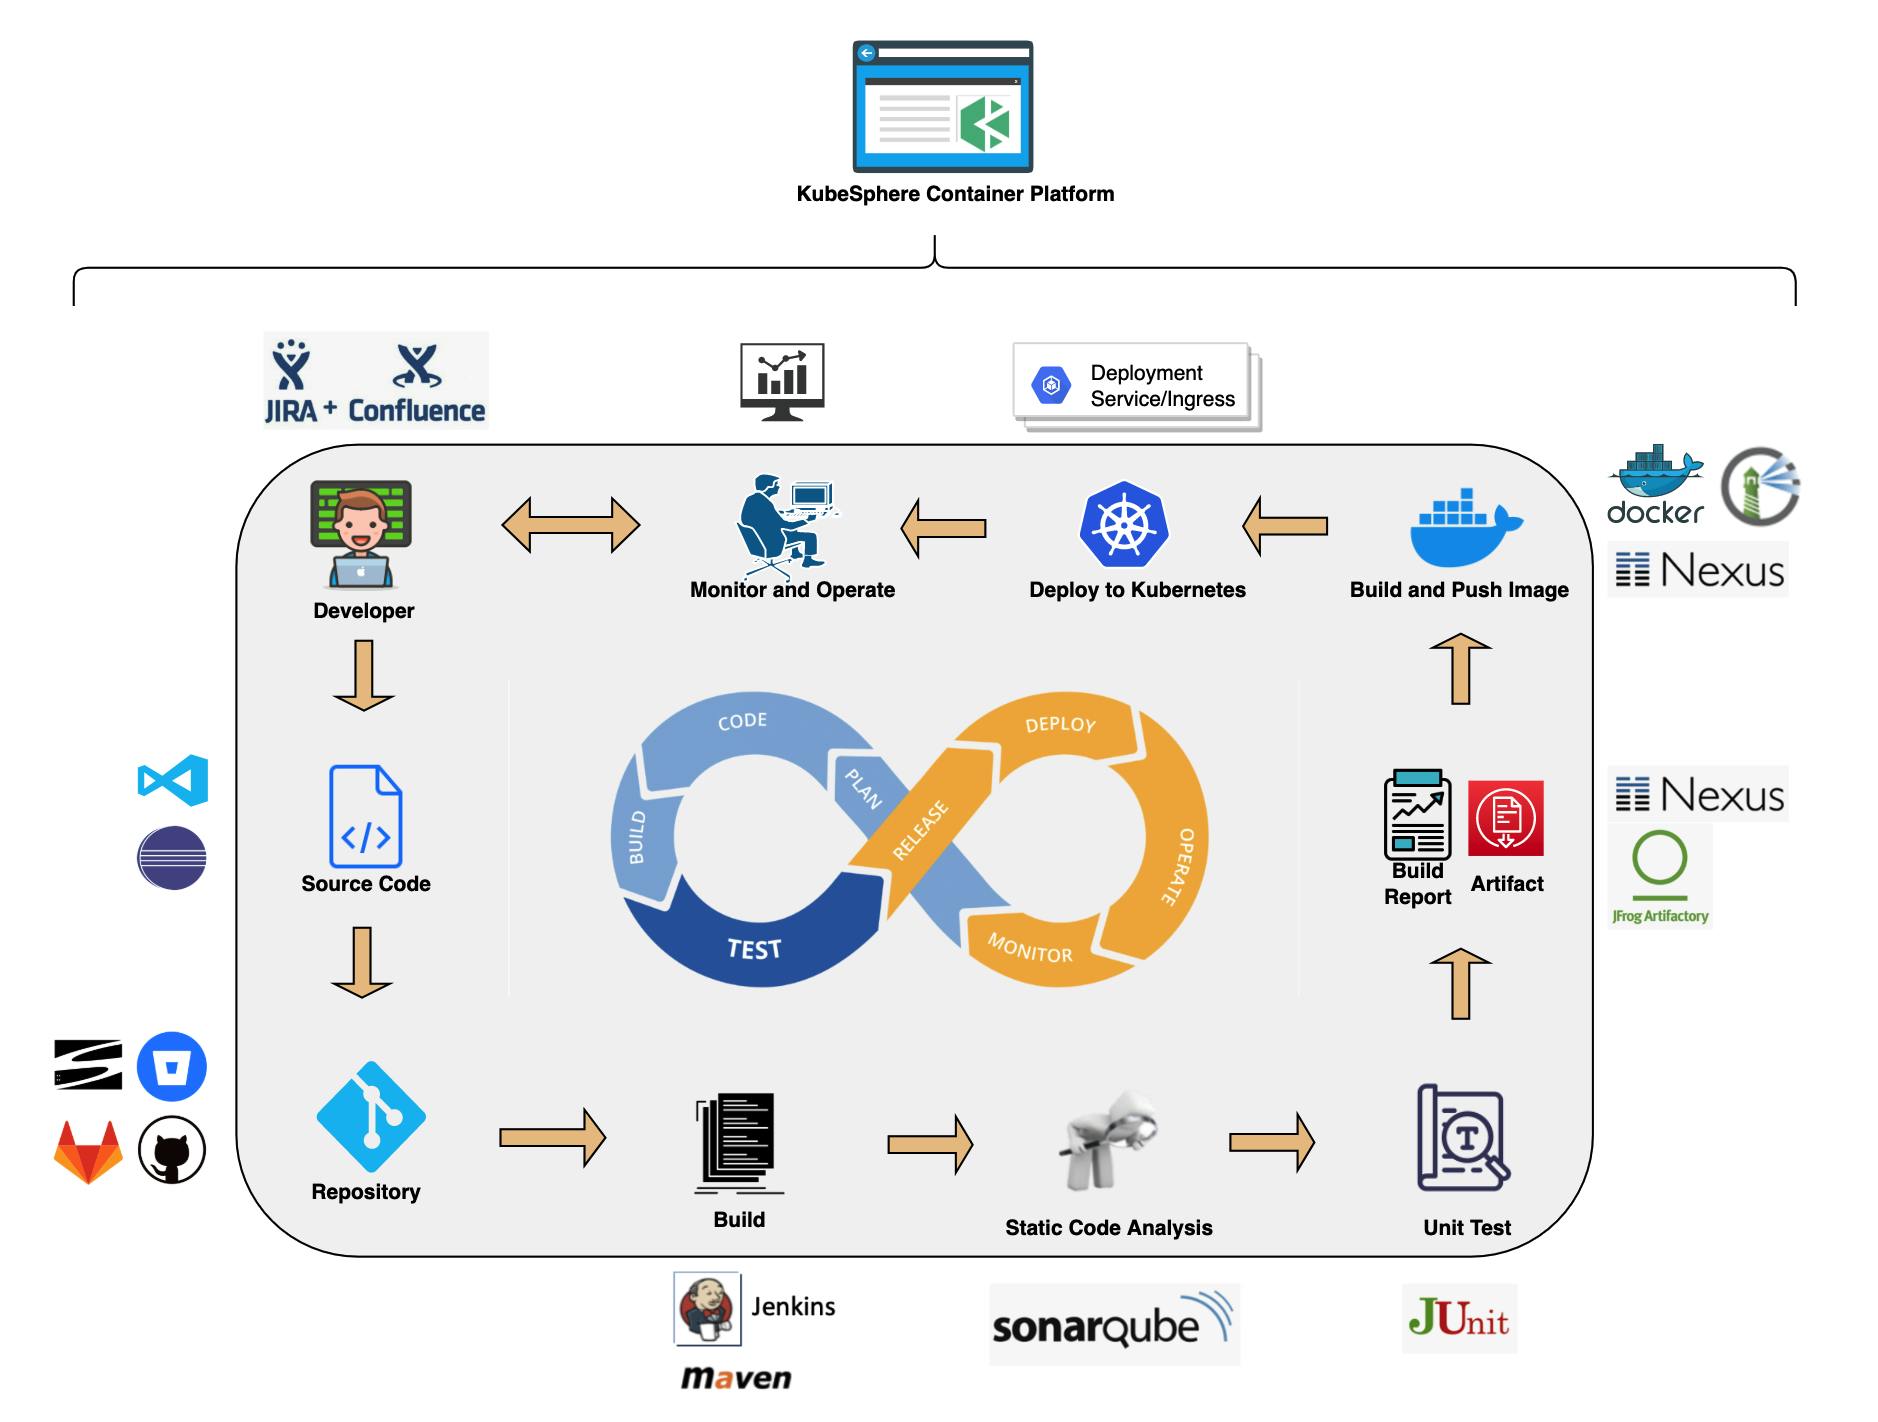
KubeSphere CI/CD pipeline workflows
A KubeSphere CI/CD pipeline runs on the back of the underlying Kubernetes Jenkins agents. These Jenkins agents can be dynamically scaled as they are dynamically provisioned or released based on the job status. The Jenkins master and agents run as Pods on KubeSphere nodes. The master runs on one of the nodes with its configuration data stored in a volume. Agents run across nodes while they may not be active all the time because they are created dynamically and deleted automatically as needed.
When the Jenkins master receives a building request, it dynamically creates Jenkins agents that run in Pods according to labels. At the same time, Jenkins agents will be registered in the master. After agents finish their jobs, they will be released and related Pods will be deleted as well.
Dynamically provision Jenkins agents
The advantages of dynamically provisioning Jenkins agents are:
Reasonable resource allocation. KubeSphere dynamically assigns agents created to idle nodes, so that jobs will not be queuing on a single node whose resource utilization is already high.
High scalability. When a KubeSphere cluster has insufficient resources which lead to long waiting time of jobs in the queue, you can add new nodes to the cluster.
High availability. When a Jenkins master fails, KubeSphere automatically creates a new Jenkins master container with the volume mounted to the new container. In this way, the data are secured with high availability achieved for the cluster.

KubeSphere DevOps System
The KubeSphere DevOps System is designed for CI/CD workflows in Kubernetes. Based on Jenkins, it provides one-stop solutions to help both development and Ops teams build, test and publish apps to Kubernetes in a straight-forward way. It also features plugin management, Binary-to-Image (B2I), Source-to-Image (S2I), code dependency caching, code quality analysis, pipeline logging, and more.
The DevOps System offers an automated environment as apps can be automatically released to the same platform. It is also compatible with third-party private image registries (for example, Harbor) and code repositories (for example, GitLab/GitHub/SVN/BitBucket). As such, it creates excellent user experience by providing users with comprehensive, visualized CI/CD pipelines which are extremely useful in air-gapped environments.
Enable Pluggable DevOps Component
KubeSphere has decoupled some core feature components since v2.1.0. These components are designed to be pluggable which means we can enable them either before or after installation. By default, KubeSphere will be deployed with a minimal installation if we do not enable them.
Different pluggable components are deployed in different namespaces. We can enable any of them based on our needs.
In this article we will learn how to enable DevOps component, i.e. KubeSphere DevOps System but before that we will see what are the resource required for this component.
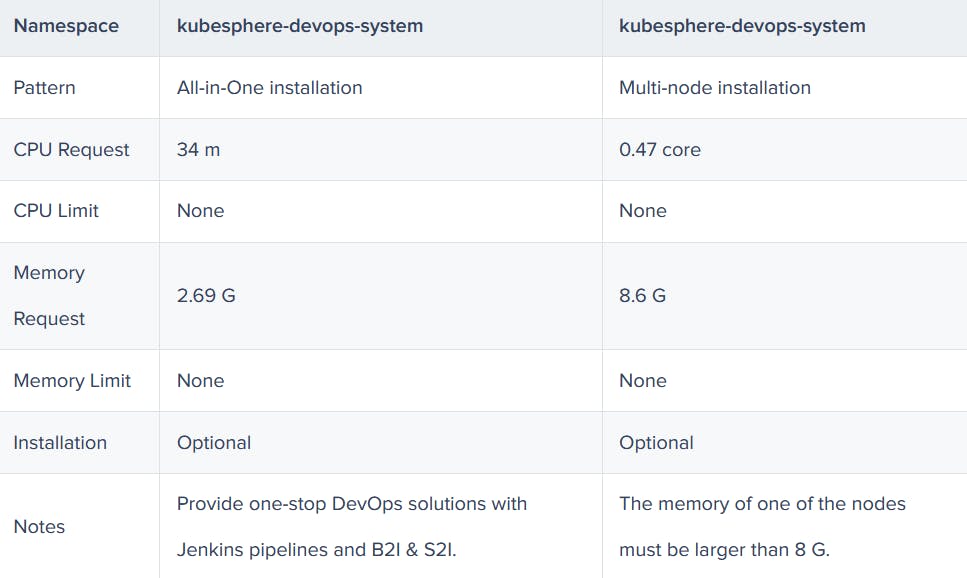
Resource Requirements
Before we enable pluggable components, we have to make sure that we have enough resources in our environment based on the tables below. Otherwise, components may crash due to a lack of resources.
Note : The following request and limit of CPU and memory resources are required by a single replica.
Enable DevOps Before Installation
Installing on Linux
When we implement multi-node installation of KubeSphere on Linux, we need to create a configuration file, which lists all KubeSphere components.
- In the tutorial of Installing KubeSphere on Linux, we create a default file
config-sample.yaml. Modify the file by running the following command:
vi config-sample.yaml
Note : If we adopt All-in-One Installation, we do not need to create a config-sample.yaml file as we can create a cluster directly. Generally, the all-in-one mode is for users who are new to KubeSphere and look to get familiar with the system. If you want to enable DevOps in this mode (for example, for testing purposes), refer to the section below where we see how DevOps can be installed after installation.
- In this file, search for
devopsand changefalsetotruefor enabled. Save the file after you finish.
devops:
  enabled: true # Change "false" to "true".
- Create a cluster using the configuration file:
./kk create cluster -f config-sample.yaml
Installing on Kubernetes
As we install KubeSphere on Kubernetes, we can enable KubeSphere DevOps first in the cluster-configuration.yaml file.
Download the file ccluster-configuration.yaml and edit it.
vi cluster-configuration.yamlIn this local
cluster-configuration.yamlfile, search fordevopsand enable DevOps by changingfalsetotruefor enabled. Save the file after you finish.devops: enabled: true # Change "false" to "true".Run the following commands to start installation:
kubectl apply -f https://github.com/kubesphere/ks-installer/releases/download/v3.2.1/kubesphere-installer.yaml

kubectl apply -f cluster-configuration.yaml
Enable DevOps After Installation
Log in to the console as
admin. Click Platform in the upper-left corner and select Cluster Management.Click CRDs and enter
clusterconfigurationin the search bar. Click the result to view its detail page.
Info : A Custom Resource Definition (CRD) allows users to create a new type of resources without adding another API server. They can use these resources like any other native Kubernetes objects.
In Custom Resources, click the icon (three dots in vertical line) on the right of
ks-installerand select Edit YAML.In this YAML file, search for
devopsand changefalsetotrueforenabled. After you finish, click OK in the lower-right corner to save the configuration.devops: enabled: true # Change "false" to "true".Use the web kubectl to check the installation process by running the following command:
kubectl logs -n kubesphere-system $(kubectl get pod -n kubesphere-system -l app=ks-install -o jsonpath='{.items[0].metadata.name}') -fNote: You can find the web kubectl tool by clicking an icon, that looks like a hammer, in the lower-right corner of the console.
Verify the Installation of the Component
We can verify the installation of our DevOps component in following two ways:
- Verify the component on the dashboard
Go to System Components and check that all components on the DevOps tab page is in Healthy state.
- Verify the component on kubectl
Run the following command to check the status of Pods:
kubectl get pod -n kubesphere-devops-system
The output may look as follows if the component runs successfully:
NAME                          READY   STATUS    RESTARTS   AGE
devops-jenkins-5cbbfbb975-hjnll   1/1     Running   0          40m
s2ioperator-0                 1/1     Running   0          41m
As we install the DevOps component, Jenkins is automatically deployed.
Wrap Up
KubeSphere delivers consolidated views while integrating a wide breadth of ecosystem tools around Kubernetes and offers consistent user experience to reduce complexity, and develops new features and capabilities that are not yet available in upstream Kubernetes. Not only does KubeSphere allow developers and DevOps teams to use their favorite tools in a unified console, but, most importantly, these functionalities are loosely coupled with the platform since they are pluggable and optional.